So I just got 20 of these Rafter Ties....
I probably don't "need" these but I'll put two on each side of the rafters - Oh I just realized - I need them for the ridge pole? No - that will be a "flush" connection - so I should be able to go straight through with no angle turn needed.
So first I have to use the loppers - I had a hilarious moment yesterday. I found a tool - a wrench connection - a deep socket that fit onto the lopper nut. The lopper was too tight so I figured if I loosened the nut then it will be easier to use. So I had to attach the drill to the deep well socket. When I then kicked the drill on - I was holding the lopper and so the drill force instead caused my OWN BODY to fly backwards! My arm strength - or my mind intention to hold the lopper must have over ridden the experience of my body flying backwards!! It was only a few inches that the drill caused me to fly back but I had left the scythe right on the floor. My foot slammed into the scythe blade but no skin was broken. It was just super funny. Like whoah - the drill is powerful!!
Then the lopper nut had loosened just enough so now the lopper was easy to move but I still could not move the nut by hand. So I figure it must not have moved the nut much since most of the force went back into my body.
So I made sure I have my "sharpening stone" in a tool box - so I can sharpen the scythe. So the first step will be to lop off a ton of willow branches - and weave them opposite as "wattle." Then I need to mix - Oh I forgot to get hydrated lime! But I will just use the hydrated lime on the outside surface and for the bed-stove fire box and the bed-stove itself.
OK so I make the wattle walls - and then mix horse manure with clay-dirt. I'll do a 3 to 1 ratio - so one part horse manure to 3 parts clay-dirt. Oh - then I need the harvest straw-hay. If I cover it in the clay-dirt that should prevent fungus mold - as the clay will desiccate the straw-hay. But I need the straw-hay for insulation.
So I'll make a kind of clay slip for inside the wattle daub - I need to look into that more. Maybe if I just pack in the straw-hay-grass - and then push in the clay-manure from the outside? I'll look into it a bit more. Usually clay slip requires "hanging" the wet straw-hay over the wattle. But then I could not pack it in for insulation. ...
So once the walls are built up - then I'll add a tree to go across the top of the posts - and then attach the rafters to that horizontal beam (i.e. the WALL PLATE - to use "mantalk.") And so I still have to cut a few more trees - unfortunately - a ridge post - and maybe four logs for the horizontal wall beams (i.e. WALL PLATE - gotta get my "mantalk" right!).
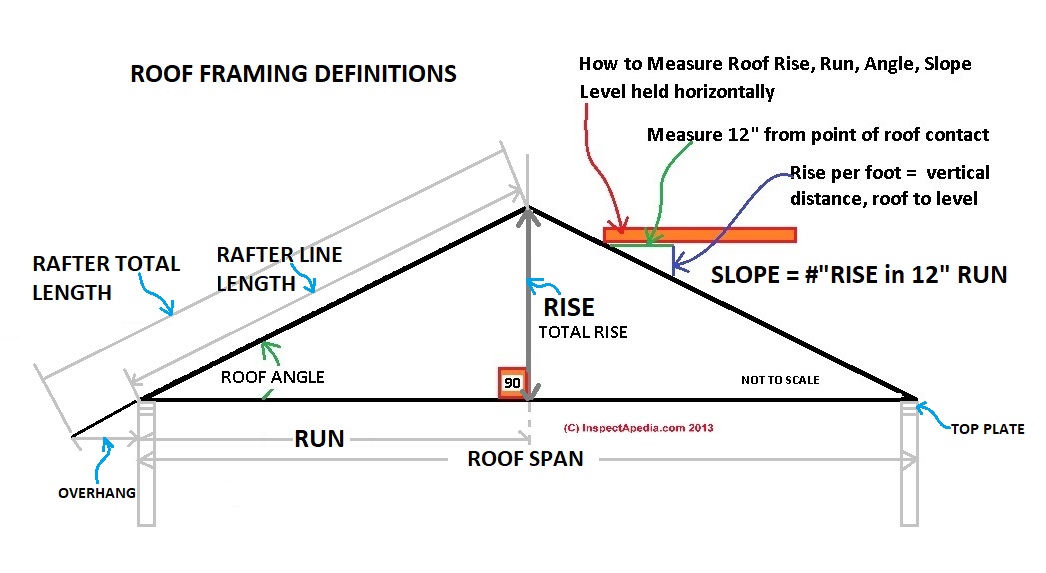
Oh then I have to cut the rafters - but those can be smaller trees. So that will be 8 logs for the rafters. Yeah so looks like I'll be cutting another 12 trees or maybe cutting some trees in half, etc. But the rafters will be only about 5 feet long - since it's 3.5. feet on each side just straight horizontal. It depends how tall the ridge pole is compared to the top of the walls - as my "rise."
I only need 7 foot tall roof but I want enough of a slant to make sure snow will slide off - since the weight can add up fast. Also I want the side walls high enough so I get more head clearance. So I figured 6 foot tall walls on the side - and so - let's see if I can figure out what a 30 degree angle would be? Or....
- The shortest leg is across from the 30-degree angle.
- The length of the hypotenuse is always two times the length of the shortest leg.
- You can find the long leg by multiplying the short leg by the square root of 3.
equals 2 feet.
So the height is 2 feet for a 30 degree pitch - and
so the length is 2 times 2 = 4 feet.
so a 2-3.5-4 foot triangle?
12.25 (3.5 squared) plus 4 (2 squared) = 16?
Not quite.... well this is an approximate math calculation.
So it should be maybe 4.5 feet for the rafter length....if I have a 2 foot height over 6 feet walls.
I think it should be closer to 45 degrees to make sure the snow sheds or slides off....
So if it is 45 degrees then the height will equal the base - which then would put the roof at over 9 feet! Here's a log cabin in Alaska - he uses a 45 degree angle (and we know why! Keep that snow off)
we'll see how long the logs are that I already cut. Hopefully it will be steeper than 30 degrees. So if I do a four foot "run" (half of the width - with a four inch over hang and the ridge beam (2 inch is half approx) - so then at 45 degrees it is even length for Rise and Run. So that just means 16 plus 16 = 32 so then square root of 32 = the slope or rafter length - which is about 5.65 feet or 68 inches approximately.
https://www.mitek-us.com/products/truss-rafter-tiedowns/hurricane-ties/HC%20/%20HCPRS%20/%20HHCP%20/%20LFTA%20/%20RT%20/%20TSP/
So this is called
RT3A Reversible Rafter Tie
so to "reverse" it - you flip it? SURE ENOUGH - the below is called the "left version" - that's pretty wild - they look VERY different for each side -OK so then on the north end of the Ridge Pole - since I won't be using an A-frame on that end - then I need to connect to smaller pieces of wood to create a "holder" for the ridge pole - as side supports.
https://www.hardwareandtools.com/usp-structural-rt3a-hurricane-seimic-anch-sng-pl-lcca-8082.html
Just to confirm - these ARE Hurricane Ties - which just sounds cool to use in Minnesota as we obviously don't get Hurricanes...
https://www.log-cabin-connection.com/structural-ridge-beam.html
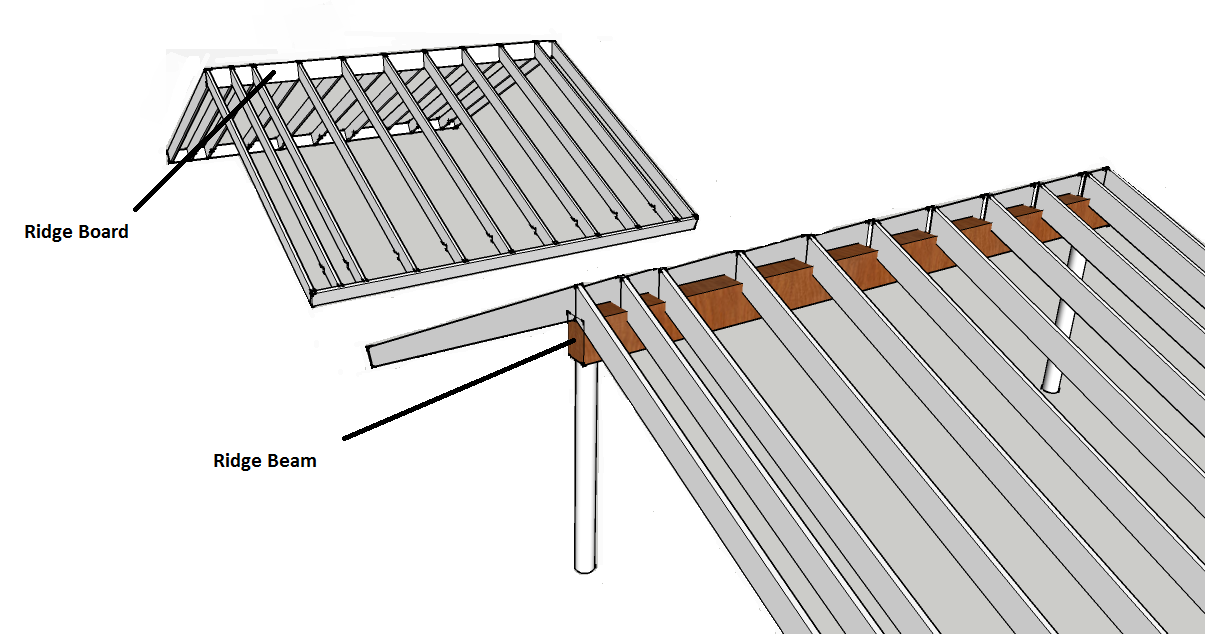
If there is no attic floor or ceiling joists, there is no way to provide resistance to outward thrust force from low ends of rafters. The bottom ends of the rafters will push out and the roof will collapse. Using a structural ridge supported on both ends means that the rafters are supported independently of each other by the ridge beam itself.how is this "not" a "ridge board"?
a ridge beam is a structural member that bears half of the live and dead loads of the rafters on either side of it, but a ridge board is not structural.
Right - this is why I wanted that "A-Frame support on one end!!
Good post, you’d be surprised at how many architects don’t understand the differences between ridge boards and ridge beams
someone comments on another site.
A easier roof would be a shed style. No ridge at all, the loads bear only on the walls that support the rafters. The rafters have to be much larger.OK I looked back at that primitive cabin vid I posted yesterday - they have their rafters ABOVE the ridge beam - not "flush" to it on the side. So that's probably a stronger system....they just used nails - so I don't have any "ties" connectors for the ridge beam. So I'll do what they did - put the rafters on top.
So for "code" you HAVE to cut a "birdmouth" for the rafter attachment to the wall beam or wait - the proper mantalk is WALL PLATE.....
So I have been watching the "step out" method OR the "math" method - using a speed square or a framer's square - and it's all very complicated. There's a couple vids where they cheat - and everyone disses them for cheating. But the primitive cabin definitely did not use any birdmouth or "seat cut."
So I will try to figure out cutting a birdmouth for a 12:12 or 45 degree angle roof - without using any kind of measurements. Just eyeballing it. Since each log is a different diameter then the birdmouth or seat cut length will have to change also it is based on the width of the wall. So I have to do any cut based on a case by case examination.
So that means the Birthmouth is also a 90 degree cut! very easy.


No comments:
Post a Comment